Tuesday, September 10, 2013

Stampin' Up Ink Pads

I have been having issues finding an ink pad that leaves my stamped images clean looking and it has been frustrating! I have started to collect more and more clear stamps and have been using less red rubber stamps. When I moved to the clear stamps I wasn't happy with the image they left. I tried stamping on different surfaces, used different inks, different papers, and it just wasn't working. 

Then I ran into the new Stampin' Up! Inks.  I was a Stampin' Up! demonstrator in the past, but left right as they were getting the new Ink pads in (bad timing lol). These new ink pads leave a really smooth texture on solid clear stamps. 
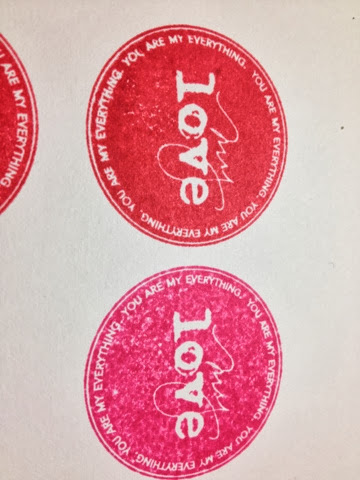
The one on the top was stamped with SU! Strawberry Slush and the one on the bottom was with Memento Rose Bud both are dye inks. The SU! Ink is far less blotchy than the Memento ink. Also the SU! inked imaged is much more crisp. Both were left to dry for about 3 minutes before taking this picture. 

I do like the compact size (not to mention the price) of the Memento Dew Drops though so I will probably continue to take them to crops, but my at home pick is defiantly SU!

Thanks for stopping by. Happy crafting!

Kelly


Thursday, March 14, 2013

Stampin' Up! Club


I had recently stopped selling Stampin' Up!, but can't stand that I am no longer a demonstrator.  Their products are just too awesome.  I used some of their new solid surface ink pads the other day and they are so great.  They make such a smooth image.  You don't see the lines you used to when stamping a solid image.  I also just found out that they are going to start carrying photopolymer stamps.
Here is the first set that SU is offering...more to come.  This set would be great for Project Life, card making , and scrapbooking.  Love how you can build it your own way.

Needless to say, I am way too excited not to rejoin.  As a celebration, I will be offering my first 10 customers 20% off their order.  Not to mention if you order by March 22nd, you qualify for Sale-a-Bration (for every $50 you spend, you can pick any item out of the Sale-A-Bration catalog).

I am also starting up a club that consists of 4-5 people that put in 2 orders quarterly.  Throughout the year, we will be rotating as the hostess and that person will get all of the hostess benefits for that order.  This means a $30-$37.50 commitment.

If you are interested in placing an order or joining the club, let me know.

Tuesday, March 12, 2013

Grandma's Love

Here is a layout that I did of my mom and daughter.  I took this when we were at their house making cookies over the holidays.

I have really been inspired by a few people on YouTube (Mercy Tiara, Shimelle Laine, and Bag Interior to name a few) lately and I really like this style of scrapbooking.  More collage style.  Really enjoying this new way of scrapping.  I feel like I have more freedom and I get to use more goodies like stickers and other emblishmens that I wasn't using before.  I did a lot of simple mat the photo, make a Cricut cut, glue everything together kind of layouts.  Now don't get me wrong, I will still probably be doing those, I have just added another style to what I do.
The paper and die cuts were from a kit that I had from a long time ago TLC (Top Line Creations)  The flower were from my stash, and the buttons and brads are Stampin' Up!.
 
 For the date stamp I used a good old office stamp that I picked up at Office Max for around $4.50 or so.
The "remember this" stamp is from a Making Memories stamp set that I believe is discontinued and the bling is from my stash.  I inked around all of the edges with Tim Holtz Distress Ink in Vintage Photo.

Hope you enjoyed.  Until next time....

Thursday, March 7, 2013

Winter Critters

Today I just wanted to share with you a few critters that I took care of at the Wildlife Center I volunteer at.

Here is the first critter.  It is a female Pallid bat.  Isn't she too cute for words.  Look at those ears (better to hear you with my dear) they are so HUGE!  Love them.  This little gal was found in a shed and was disturbed during her hibernation.  I didn't actually get to feed her, but was able to hang out and watch one of the animal care staff.  She wasn't all that hungry, but she did just wake up.
    

The most interesting thing about her is the fact that she isn't even suppose to from around here.  I live in the mid-West and her territory barely reaches into southern Kansas.  They are typically found in arid and semi-arid regions across much of the American west, up and down the coast from Canada and Mexico.  There are a few isolated colonies in northern Oklahoma and southern Kansas, but that is all.  Pretty neat stuff if you ask me.


One more critter I got the privilege of hanging with was this turtle.  He is an Eastern Box Turtle.  I just love his bright colors (I believe this one is the male).  He reminds me of Spring.  Can't wait for the warmer weather.  I bet he can't wait as well.  That means he will soon, hopefully, be released back to where he came from.


Hope you enjoyed a little break from the typically crafty posts.  Until next time.

Thursday, February 14, 2013

Homemade Ink Blenders

Long lost post.  I apparently put this together about 10 months ago but didn't post is.

I got this great idea originally from luvleescrappin, but then I saw cricutologist32820 using a different type of block.  I think they are old wood blocks from stamps she unmounted (she had one video where she was talking about unmounting all of her stamps).  Anyway, I was so excited.  I had actually just unmounted (see my previous post) almost all of my Stampin' Up! stamps and really wanted to find another use for the blocks (I wasn't about to throw them away.  I would make something out of them before doing that :)

Well here is the process.
First I took my wood blocks from my Stampin' Up! sets that I unmounted.  I had all different sizes.  The ones that are longer I am going to cut with my miter saw.  I had a few that were smaller and I ended up trimming just a bit of the foam applicator off in the end.  If you don't have any of these, you can go to your local hardware store and buy wood and cut it to size.
Besides the wood blocks, you are also going to need some adhesive velcro (just the scratchy side) and Inkssentials Ink Blending Foam.
I attached two strips of velcro to the block (I could not find any wide enough to cover with one strip, but this size was perfect when I put them side by side.  Then I added on the blending foam.  Wa-la, ink applicator.
Of course I needed a place to stores these (look, I have space for more, guess that means I am going shopping).  I found this box at Walmart for $2. 
To top everything off (literally), I made some labels using white card stock and my Xyron adhesive machine.  I inked up the stickers, wrote the color, and affixed it to the top of the block.
 Now I can have a block for every color and no need to change out the pads every time I go to grab another color.  Love it!!

Happy craftin'

Monday, February 11, 2013

Bee Mine

Over the weekend, I made these cute Valentine's cards for my daughter's preschool class.  I guess I could have bought some of those paper Valentine's from Walgreen's, but this gives me an excuse to do something crafty and use my Cricut (need some justification for all the carts that I have ).


I cut white cardstock at 3x4" and rounded all of the corners with my We R Memory Keepers Corner Chomper (1/4" side).  Then inked around the edges with Tim Holtz - Fired Brick Distress Ink.


Then I cut my bee from the Walk In My Garden Cricut cart at 2" using the Cricut Craft Room software on my Mac.  I used various cardstock from my stash (love using the Cricut with my enormous scraps "collection").

I also cut a red heart (Create a Critter - I think) and "mine" (Jubilee) with the Cricut as well.  Didn't note the size on these, sorry.  Just used the grid lines on the Cricut Craft Room to ensure they would fit on the card.


I assembled all of the pieces onto the 3x4" white card and done (ended up adding some Christmas Red Stickles to the heart for some extra pizzazz).

My daughter, without asking me first, ended up writing her name on the front of each card in red pen.  I was really wanting it to be on the backside, but at least is was in red and you can read it :).

Happy Crafting!